Initially, you buy small countertop appliances to make life easier. And they do the job admirably. Then, just when you feel you have mastered this kitchen game, these appliances turn on you like little out-of-control robots and begin to create more work for you.
One reason is because owners, thinking that small appliances will just take care of themselves fail to maintain or optimize them. Yet unlike our larger appliances, small ones are often called upon to do more work, more frequently, and with less care given to them. As an example, when was the last time you cleaned the inside of your toaster oven, as opposed to your stove top?
Learning how to clean, maintain, and optimize the performance of your small appliances will keep them running smoothly for years to come. Replacing common wear small appliance parts can also add longevity to your appliances and it will keep your local landfill clear of needless waste.
Cleaning and Maintaining Stainless Steel
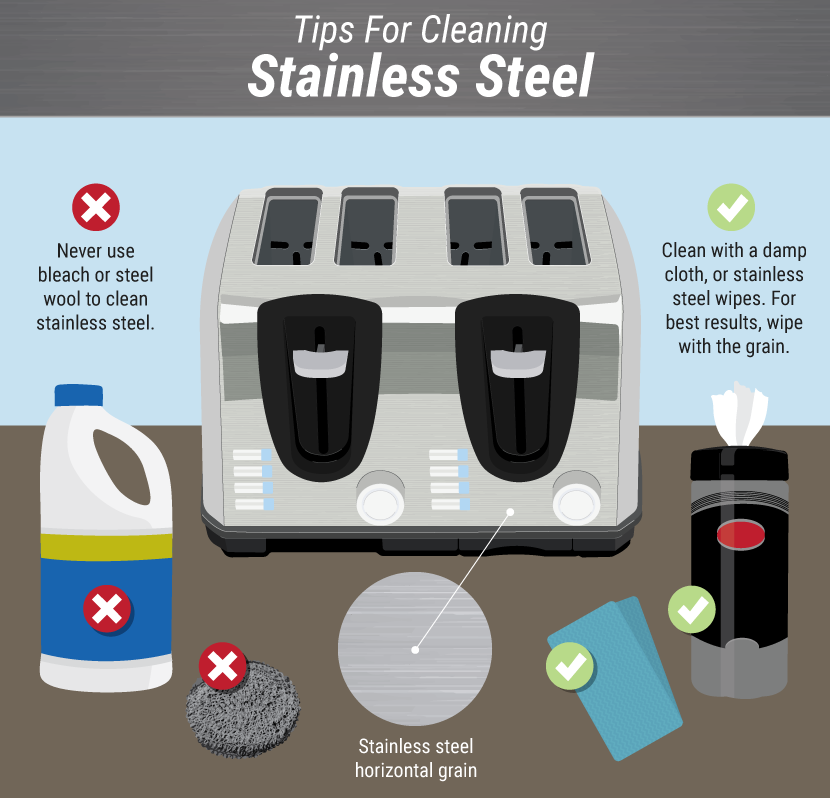
Stainless steel is a popular surface for small kitchen appliances, but it also adds to many homeowners’ frustration due to the tendency of fingerprints to remain on material.
First, never use chlorine bleach or any product containing chloride. Second, never use any kind of abrasive material, such as steel wool, steel brushes, or anything even remotely abrasive.
For normal cleaning of stainless steel, wipe it down with a damp, soft cloth. Be sure to always wipe in the direction of the stainless steel grain. When you have heavy grease and baked-on particles, use a nylon scrubber with a mild detergent.
For long-term maintenance of stainless steel, occasionally spray it down with a specialty stainless steel polish or silicone-based spray, both of which give your surface a lustrous, smooth, and rich appearance.
Electrical Cords
Unless you are lucky enough to have a friendly appliance repair shop on the corner, all small countertop appliances that have faulty cords should be replaced rather than repaired by you.
Unlike large appliances such as refrigerators and microwaves, small countertop appliances are in danger of frayed cords because they are moved around and are plugged and unplugged frequently.
Unplug When Not In Use?
You can avoid problems in the first place by leaving your most frequently used small appliances plugged in and in one place as much as possible.
One problem with this is that, according to the U.S. Department of Energy, small appliances are considered to be energy vampire that draw power even when turned off.
An easy solution is to plug your small appliances into power strips. This allows you to cut power to the appliances simply by toggling the power strip’s switch, rather than constantly plugging and unplugging them.2
Breathing Room: Appliances That Have Air Vents
A few small appliances, such as microwaves and compact refrigerators, have air vents that expel hot air to prevent the motors from overheating.
Ensure that air vents have two to three inches of breathing room by sliding them away from walls or other obstructions.
Specific Appliances
Drip Coffeemakers
Determined coffee drinkers know the lift that coffee gives them every day. But this lift takes a toll on their machine. Oily coffee residue quickly builds up in the pot and on all working parts that come into contact with the coffee.
To clean, use a mixture of 2 parts water and 1 part vinegar. Pour it into the coffee reservoir. Let it sit for a few minutes. Turn on the machine for one full brew cycle. Let the water accumulate in the carafe and sit there for 15 to 20 minutes, with the heating element turn off. For stubborn stains in the carafe, sprinkle in a little baking soda and scrub with a soft sponge.3 Clean the outside of the machine with a soft, damp cloth.
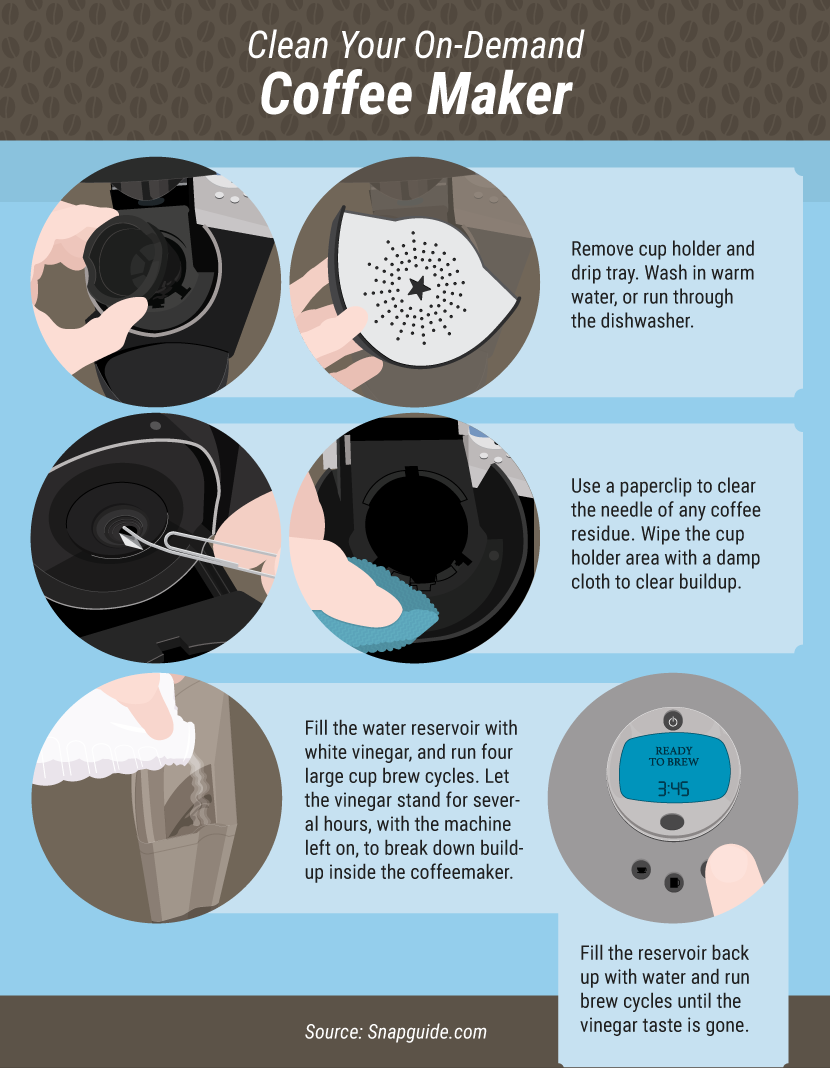
On-demand or single-cup coffeemakers such as the popular Keurig brand require regular maintenance and cleaning to keep them operating in optimal condition.
Regularly remove the cup holder, rinse it in the sink, and put it in the utensil rack of your dishwasher. Examine the bottom part of the cup holder to make sure there are no coffee grounds obstructing it. Remove the drip tray and rinse by hand in the sink. Occasionally wipe down the plastic portions of your machine with a damp, soft cloth to remove coffee grounds.
To de-scale your machine, fill the reservoir with white vinegar and place it back on the machine. Run four large-cup cycles, with no K-Cup in the machine. Leave the machine on with the brewing element hot for about four hours, to allow time for the vinegar to break down the scale. Discard the vinegar. Run cycles until the Add Water warning is displayed. This will ensure that all of the vinegar is removed from the system. Run two more cycles with water to remove the vinegar taste.
Microwaves
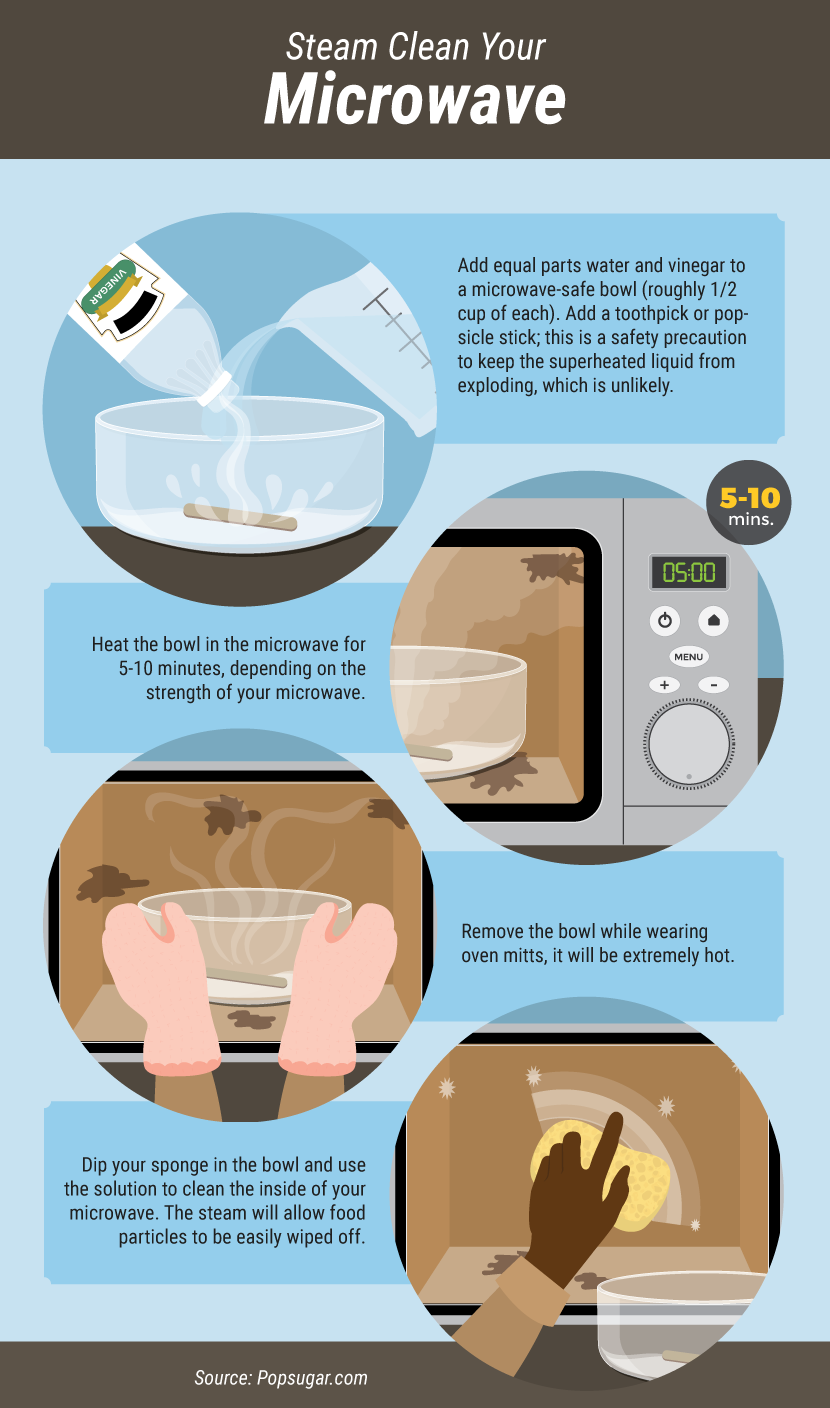
Due to their size and high electrical draw of up to 1,200 watts, microwaves are difficult small countertop appliances to clean and maintain.
Because microwaves give off small amounts of radiation through an electron tube called a magnetron, you should never attempt to repair one yourself. Always call in a technician for this. When a spill occurs in a microwave, wipe it up immediately with a sponge damp with warm water.
One trick for cleaning the inside of your microwave is to pour 1 cup of water in a microwave-safe container such as a Pyrex measuring cup and heat the water in the microwave for several minutes until the water comes to a full boil. The steam coating the inside of the microwave will help loosen debris. Wipe down within a few minutes to avoid having the debris dry on you again.
Can Openers
If you have never cleaned your electric can opener, you are inviting the growth of germs and bacteria. Think about it: would you willingly eat old, unidentifiable chunks of food that have been lying on your counter for several days?
Yet by using a can opener that is not cleaned on a regular basis, you are doing just that. Food from previously opened cans remains on the blades. Since this appliance should never be submerged in water, clean the blades with a toothbrush that has been soaked in warm, soapy water.
Toasters
It should go without saying that toasters should never be immersed in water. That said, toasters tend to pile up more crumbs and food filth than most other small appliances. What to do?
Most toasters have a slide-out crumb tray. You can remove this and wash it on the top rack of your dishwasher. The outside of your toaster can be cleaned with a thoroughly squeezed-out sponge containing mild detergent and warm water.
Clean out the inside of the toaster by turning it upside down over the sink and letting debris fall into the sink basin.
Toaster Ovens
Toaster ovens, the epitome of crumbs and baked-on gunk, can be the hardest small kitchen appliance to maintain and keep clean.
Clean by taking out all removable parts, such as crumb trays and racks. Clean these items separately in your sink with a non-abrasive nylon scrubber and all-purpose cleaner. Clean the inside of the oven by spraying small amounts of cleaner directly onto the scrubber and wiping inside, avoiding the heating element.
Blenders
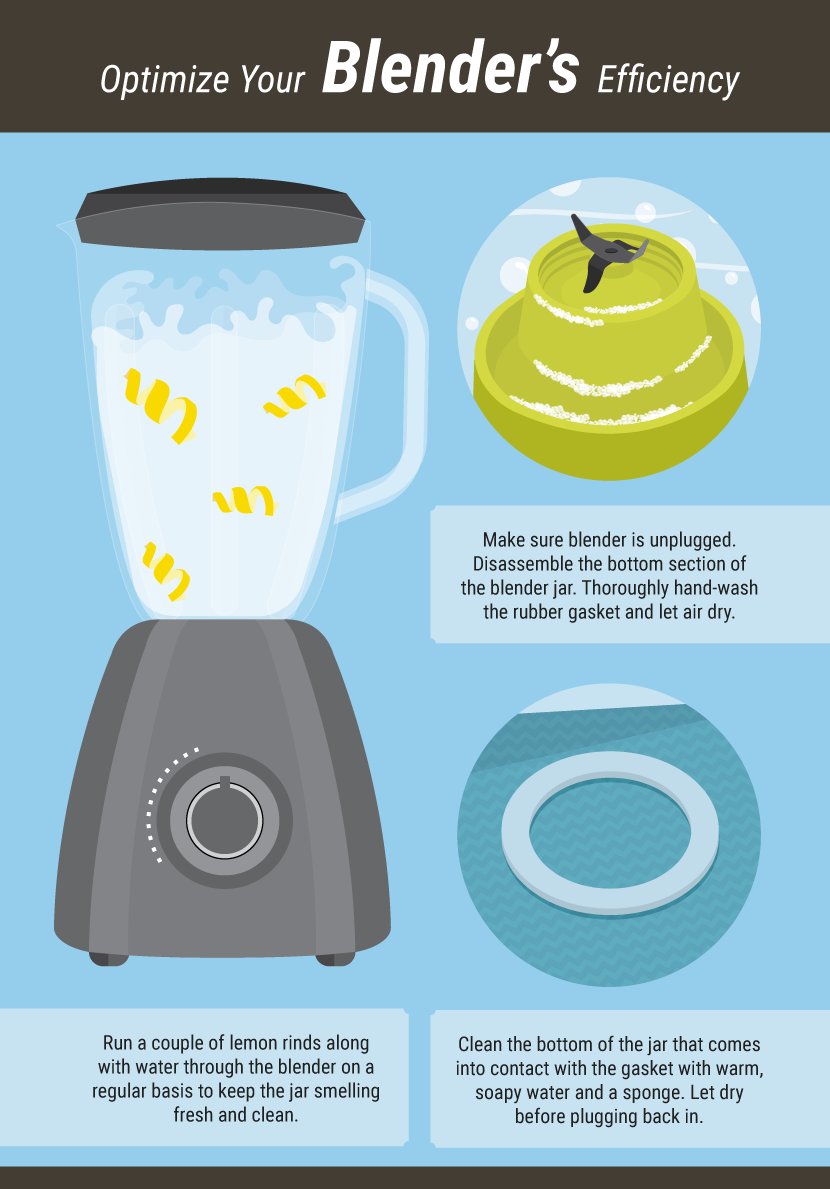
Blenders often fail because they are expected to do more work than they are designed for. Be sure that the mixture you are blending is well liquefied, since hard, dry mixtures create undue stress on the motor.
To prevent leaks, make sure that your blender’s rubber gasket remains clean and in good shape. To do this, unscrew the blade assembly from the bottom of the mixing jar and carefully disassemble. Clean the rubber gasket with warm water and dish detergent and then let dry. Be careful when cleaning the blade section as the blades are extremely sharp. When all components are dry, reassemble and give the blender a test run for ten seconds with water in the jar. Remove the jar and examine for signs of leaks.
One trick for keeping your blender smelling fresh is to blend a couple of lemon rinds with water for a few seconds. Keep the jar in tip-top shape by cleaning it after each use. Simply pour 1 cup of hot water and 1 drop of dish washing liquid into the jar, place the jar on the base, and pulse for 5 seconds.
For less frequent but more thorough cleaning, fill the jar entirely with hot water, add 1 to 2 teaspoons of liquid chlorine bleach, let stand for 5 minutes, and then dump the mixture. Rinse thoroughly with clean water.
Small countertop appliances, time-savers in the kitchen, are only as good as the amount of effort you put into cleaning, maintaining, and optimizing them.


 Tamarac, FL